We went on a cruise through the Western Mediterranean. I began noticing every morning that all of these Europeans on the ship with us would stock up on the croissants at the breakfast buffet. Seriously, the staff were ALWAYS restocking that tray! So, I branched out, and tried one. WOW! It opened up a whole new world to me! The best croissant I remember eating was at the main train station in Berlin. We were walking by a coffee shop, and the lady working there was restocking the food counter with hot, fresh croissants. You could smell their freshness! So, I bought one, and it was amazing! It made the moment of sitting on the ground, waiting for a train to take us to our next destination (Amsterdam, I think), a completely memorable moment.
So, this has made croissants something I’ve been dying to try to make. Now, croissants take a lot of time to make. The dough needs to be rolled, folded and chilled a few times to make those delicious flaky layers. I worked up the courage, and tried it on Monday. I baked my croissants on Tuesday, and it was totally worth the work. Wow! But, aside from the time, it’s not really that difficult to make croissants. If you can roll out dough and have some patience, I think you can probably do it.
It takes a day where you can be in and out of the kitchen… at least 5 or 6 times, allowing the dough to chill in between, and then at least an hour or preferably overnight to chill the dough before you bake the croissants. It’s a lot of time, but it’s worth it. Trust me! There is a lot of time that you don’t need to be paying attention to the dough and you can do other things. After you’re done, you will have a reaction similar to mine (dancing around the kitchen, chanting “I did it! I did it!”). I feel fulfilled as a baker now!
I got the recipe from The King Arthur Flour Baker’s Companion. I borrowed it from my Grandma’s house, and let me tell you– this is a comprehensive baking cookbook! It is over 600 pages long, with tons of information and recipes. I may have to buy it for myself… it’s that good!
Puff Pastry
Recipe from The King Arthur Flour Baker’s Companion
Half of the dough makes 12 croissants (freeze the other half; see below)
3-1/2 cups all-purpose flour
4 Tbsp. chilled butter
1-1/2 tsp. salt
1-1/4 cup cold water
Butter mixture:
1/2 cup unbleached all-purpose flour
1-3/4 cup butter, softened, but still cool to the touch
1 egg beaten with 1 tbsp water, to glaze croissants before baking
Place the flour in a medium bowl and combine it with the chilled butter until the mixture resembles cornmeal (I used frozen butter and grated it in, using the coarse side of my box grater. You could also use a pastry blender). Add the salt to the water, stir well, and then add to the flour. Mix gently with a fork until the dough is rough and pulls away from the sides of the bowl. (If you need to add more water, do so one tablespoon at a time until the dough holds together). Turn out the dough onto a lightly floured surface, and knead until it’s smooth and a bit springy; 2-3 minutes. Pat it into a square, wrap it in plastic wrap and refrigerate for 30 minutes.
Now, for the butter mixture. Using a mixer, a food processor or a spoon, combine the flour and butter until they are smooth and well-blended. Lightly flour a piece or plastic wrap and on it, shape the butter-flour mixture into an 8-inch square (this was a bit messy for me. Use a spatula or something to help you).
Cover the butter and place it on a flat surface in the fridge for at least 30 minutes (I put mine on my cutting board and slid the whole thing in the fridge).
Now, after everything has chilled for at least 30 minutes, remove the dough from the fridge, and roll it into a 12 inch square on a lightly floured surface. Put the butter square in the center of the dough, so it looks like a diamond in the square (my dough wasn’t very square, but you can still get the idea from the picture!)
Fold the flaps of the dough over the butter until they meet in the middle. Pinch and seal the edges of the dough together; use a bit of water if necessary.
Dust the top of the dough with flour, then turn the dough over, and gently, tap it with the rolling pin into a rectangular shape. Make sure the dough isn’t sticking, and roll it from the center into a 20 x 10 inch rectangle.
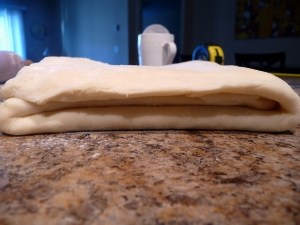
Lightly sweep off any excess flour from the top of the dough with a pastry brush, and then fold the bottom fold up to the center, and the top third over (like a letter!).

Fold the bottom third up. This picture is taken from the other side of my peninsula, which is it looks reversed.
Make sure the edges of the dough are lined up evenly. Now, turn the package 90 degrees to the right, so it looks like a book that is ready to be opened:
You’ve successfully completed one turn!
Now, if your dough is still relaxed and soft to the touch, roll out your dough and fold it again. Once you’ve completed two turns, wrap your dough in plastic wrap and chill it in the fridge for at least 30 minutes. Classic puff pastry gets six turns before being formed into shapes, and it needs to rest, chilled for at least 30 minutes between every two turns.
So, once you’ve completed six turns, wrap your dough well and chill for at least an hour (or preferably overnight).
This recipe makes enough for 24 croissants, so at this point, cut your dough in half, wrap one half very well and put it in the freezer. It will keep for 3- 6 months. Thaw it in the refrigerator overnight before you use it.
When you’re ready to make your croissants:
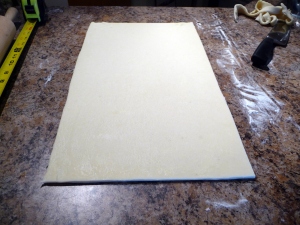
Take out the dough (half of your puff pastry recipe), and on a lightly floured surface, roll the dough to a 12 x 18 inch rectangle. Trim the edges with a sharp knife all the way around, using a ruler (this cuts off the folded edges, that would inhibit the puff).
Cut the dough into thirds lengthwise, and in half through the middle. You should have 6 pieces of dough.
Now, cut each rectangle in half diagonally, and arrange the pieces so that the point of the triangle is facing away from you. Cut a 1/2″ notch in each triangle, on the short side, then roll up, away from you.
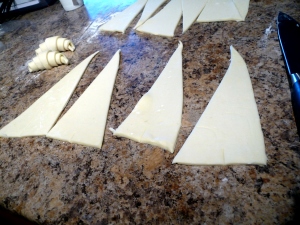
Two croissants already folded. If you look carefully in the dough on the right, you can see the notch that was cut.
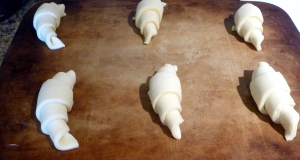
Make sure that the point is tucked under the bottom of the croissant. You can stretch the dough to achieve this, if necessary. Form the croissant by bending the two ends towards each other.
I decided that the two of us here didn’t need to eat 12 croissants. So, I formed 6 of them, and froze them on a baking sheet, to be put into a freezer bag when solid. To bake them, I’m going to thaw them in the fridge overnight, and then bake as directed below.
Place the croissants on a lightly greased baking sheet (I used a stone). Cover and chill for at least 30 minutes. During that time, preheat the oven to 425°F.
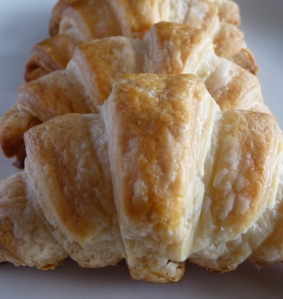
Take the croissants, out of the fridge, uncover them, and brush the tops with the beaten egg. Bake for 15 minutes. Reduce the heat to 350°F, and bake for another 10-15 minutes. The croissants should be deep golden brown, even where the edges of the dough overlaps. Remove from the oven and cool completely on a wire rack.
Now, enjoy them! Eat them as a special treat with someone you love! All of the work is worth it when you bite into that flaky, buttery delight!
Love,
The Hungry Teacher





OMG!!! Amy these look delicious!! My kids love croissants. I may have to try this one day soon. Thanks for the recipe 🙂
I have to admit that I’m way to impatient to try baking these (I’m not even brave enough to try regular ol’ bread). BUT…they look absolutely AMAZING!! I’m drooling on my keyboard as I type this… You’ve got quite a talent to make these babies turn out so well!
wow amy! these look amaing! good job!!
Wow, I’m mega impressed! They are gorgeous!
Impressive. I tried them once a long time ago but didn’t have the patience. You’ve inspired me into thinking I could do it again (and have them actually work)