Monthly Archives: March 2010

Caramelized Onion Dip with Microwave Potato Chips

I’m sorry.  I have to apologize for putting these two recipes on my blog.  They are so good, you won’t be able to stop making them.  These two recipes may change your life like they did mine.  Every time I get a snack food craving, these are the two recipes I reach for.  Seriously.  They are amazing and incredible. 

The Caramelized Onion Dip is better than the containers you buy from the grocery store.  The potato chips are so good that you cannot believe it until you try them.  They are thick and crunchy and actually taste like potatoes!  Imagine that!

By the way, if you need a new blog to check out, check out Life’s Ambrosia.  There are tons of great recipes over there with beautiful photos. 

Now, a few tips.  When you are caramelizing the onions for the dip, use a low temperature.  Don’t burn the onions!  You want them to brown really slowly and get soft.  If they are cooking too quickly (you’ll know it when you see it), turn down the heat and keep stirring!

I know you don’t believe me about the microwave potato chips.  But they seriously work and get crispy!  I use a mandolin (food slicer) to get my potatoes pretty thin.  I like the chips that way. You can slice them thinner or thicker, as long as they’re uniform.  The times it takes for the chips to cook seem to vary… so, I’ll give you my approximate times, but because all microwaves (and all potatoes!) are different, keep your eyes on the chips and use your judgment.

Caramelized Onion Dip
Recipe barely adapted from Life’s Ambrosia
Makes just over 1 cup

1 Tbsp. olive oil
1 cup onions, finely chopped
1 clove garlic, minced
1/2 cup mayonnaise
1/2 cup sour cream
1/2 tsp Worcestershire sauce
1/2 tsp balsamic vinegar
1/4 tsp salt
1/4 tsp pepper

In a small skillet, heat the olive oil over medium-low heat.  Add the onions and garlic.  Cook for approximately 20 minutes, stirring often, until the onions are golden brown and soft.  Set the onions aside, and let cool.

Combine the rest of the  ingredients, including the cooled onions.  Refrigerate the dip for at least 30 minutes.  Longer is better because the flavours really meld together and improve. 

Serve this dip with chips or cut up veggies.

Microwave Potato Chips
Recipe from Food Gal
Basically, this recipe makes as much as you’d like.  Use one potato for an individual snack… or more for more people!

Russet potatoes, scrubbed well
Extra virgin olive oil
Kosher or sea salt
Cooking spray

Slice your potatoes thinly, using a mandolin, or a knife.  You want them at least 1/8″ thick or thinner.  Toss the slices in a medium sized bowl with some olive oil.

Take a large microwave-safe plate, and coat with cooking spray.  Arrange the oiled potato slices on the plate in a single layer.  Sprinkle with salt.  Microwave, uncovered, on high for 2-3 minutes (mine always take at least 3 minutes) or until some spots start to brown (or until the slices begin to look dry).  Turn the slices over (CAREFUL, the plate and potatoes are HOT!).  Continue to microwave for 2-4 minutes until the slices are crisp and brown in spots.  I actually let mine get quite brown.  They don’t taste burnt, but I also like my food well-browned and crispy!    Keep checking frequently, and rearrange the slices if necessary and take them out once they’re done.  Transfer the chips to another plate when done.  Let them cool, because they crisp up more and taste better.

The chips can be stored in an airtight container.

Get snacking!
The Hungry Teacher

4 Comments

Filed under Uncategorized

Potato Soup with the Works

Last night, I needed a meal that would be quick to eat, without a lot of dishes, because the husband and I wanted to go out furniture shopping as soon as we possibly could.  What’s quicker to eat than soup?  Maybe a sandwich… but I really wanted soup. 

I browsed through practically a million cookbooks, before spying Rachael Ray’s Big Orange Book.  A few years ago, I was really into Rachael, but a lot of her recipes use a lot of dishes… which aren’t so fun.  But she has fantastic, enjoyable recipes and a lot of them taste AMAZING!

I found the recipe for Potato Soup with the Works.  Um…. yum!  That sounds incredible!  And as my husband says “how can you go wrong with sour cream and bacon?”  I would have to agree.

The original recipe called for 4 leeks, white parts only, chopped.  I substituted 1 whole white onion, chopped.  It’s  a lot cheaper, plus easier to work with, as you don’t have to wash all of the grit out of the leeks.  Sometimes I do cook with leeks, but today, I just didn’t feel like it.

Potato Soup with the Works
Recipe adapted from Rachael Ray’s Big Orange Book
Serves 4-6

8 slices bacon, chopped
1 large white or yellow onion, peeled and chopped
4-5 garlic cloves, chopped
1 tsp dried thyme
1 Tbsp. paprika, plus extra for garnish
Salt and pepper
4 lbs russet potatoes, peeled and chopped
6 cups chicken stock
A dash of hot sauce (optional)
1 cup shredded sharp cheddar cheese,  for garnish
Chopped green onions, for garnish
Sour cream, for garnish

In a large, heavy-bottomed pot, cook the bacon over medium-high heat until golden brown, 3 to 4 minutes.  Remove the cooked bacon to a paper-towel-lined plate and reserve.

Add the onions and garlic to the bacon fat and cook until tender, 4 to 5 minutes.  Add the thyme, paprika, and salt and pepper, then add the potatoes and stock to the pot and bring up to a bubble over high heat.  Reduce the heat to medium and simmer until the potatoes are cooked through 8 to 10 minutes.    When the potatoes are tender, use an immersion blender (or food processor, or blender) to puree the soup until smooth.

Taste and adjust the seasonings with salt, pepper and hot sauce, if desired.  Serve the soup in a bowl topped with cheese, bacon, green onions, sour cream and a dash of paprika.

So yummy!
The Hungry Teacher

1 Comment

Filed under Potatoes, Soup

Quiche a la Tomate, Nicoise

Last week, the husband and I went for a vacation.  We drove along the Oregon Coast (oh, it’s so beautiful there!) and went in-land for a night to visit my grandparents and other family in Oregon.  We had a great time.  The coast is amazing!  If you’ve never been there, you should go one day.  It’s something incredible to see even in the middle of  a spring storm (complete with high winds, lots of rain and even some crazy hail!).  In the summer time, I think it would be simply spectacular.  (I know I went when I was a young child, but I hardly remember it… just clamming, which I hated).

One of the beautiful places we stopped.

While we were on vacation, we found an independent bookstore.  There are not that many independent (new) bookstores in Canada, so it’s pretty cool to find one!  I bought Mastering the Art of French Cooking by Julia Child.  I realize that it’s totally stereotypical and a popular book choice simply because of the movie (Julie and Julia).  However, I listened to the autobiography of Julia Child (My Life in France), and it was a pretty amazing story.  Julia Child tested each recipe at least 5-6 times before it made it into the book.  The final product of Mastering took about 10 years to complete! 
 
So, I started reading the book, and it’s a great cookbook!  Julia Child did a lot of research into her recipes, and the book is full of a lot of information.  There are recipes that I’m not sure I’ll ever cook (for example, aspic– jelled stock… eww) … but there are definitely recipes I want to try.  And really, how can you go wrong with French food?  And the cook book is surprisingly easy to read and follow.  The ingredients are pretty common and the recipes are well-written.
 
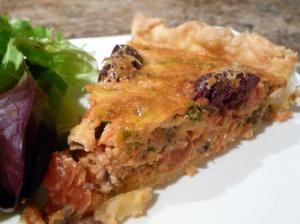
So, I decided to try making this quiche.  It was really good!  It has anchovies in.  I had anchovies in Italy in a pasta salad (whole fillets!), so I knew I could eat them.  They have a salty flavour, and they add body to the quiche.  I know anchovies are scary to use, but try them!  They’re really good in some things, and surprisingly decent in others:)
 
For this recipe, you need a partially baked 8-inch pastry shell.  To do this, preheat your oven to 400°F.  Take your pastry and put it in your pie plate (I had made about 6 crusts earlier and frozen them in aluminum pie plates).  Take a fork and punch a bunch of holes in the bottom of your crust.  This will release the air so that your crust won’t get air bubbles.  Take a piece of parchment paper and butter one side.  Put the butter side down inside the pie dough and fill it with dried beans or pie weights.  Bake for 8-9 minutes.  Take it out of the oven, and remove the parchment paper and beans or weights.  The beans can be saved especially for this purpose and reused.  By the way, this method of partially baking a pie crust is also known as blind baking.
 
To easily peel the tomatoes, put some water on to boil.  When it’s boiling, drop one or two tomatoes in for 10 seconds.  Take them out of the water and peel them!  The peels should come off quite easily.  To seed the tomatoes, cut them in half width-wise (not through the stem) and gently squeeze out the seeds and juice.  You can discard them, and just keep the flesh.
 
Quiche A La Tomate, Nicoise
Recipe barely adapted from Mastering the Art of French Cooking by Julia Child
Serves 4-6
 
1/4 cup minced onions
2 Tbsp. olive oil
1-3/4 to 2 lbs firm, red, ripe tomatoes, peeled and seeded (see note above)
1 large clove mashed garlic (I minced mine)
1/2 tsp oregano, basil or thyme
1/2 tsp salt
1/8 tsp pepper
1 egg and 3 egg yolks
1 small can of anchovy fillets, chopped
3 Tbsp. olive oil (use the oil from the anchovies and make the remainder of 3 Tbsp. with olive oil)
3 Tbsp. tomato paste
3 Tbsp. chopped parsley
1 tsp paprika
Pinch of cayenne pepper
8 inch partially baked pastry shell on a baking sheet
12 pitted black olives (preferably Kalamata or other Mediterranean olives)
1/4 cup grated Parmesan or Swiss cheese
1 Tbsp. olive oil
 
Cook the onions slowly in the 2 Tbsp. olive oil for 5 minutes, or until tender, but not browned.
 
Chop the tomatoes roughly.  Stir the tomatoes into the skillet and add the garlic, herbs and salt and pepper.  Cover skillet and cook for 5 minutes over low heat.  Uncover, raise heat and cook for 5 minutes more, shaking pan occasionally until the juice is almost evaporated entirely.  Allow to cool slightly.
 
Beat the egg, egg yolks, anchovies, oil, tomato paste, parsley and seasonings in a mixing bowl until blended.  Gradually fold in the cooked tomatoes.
 
Spread the tomato mixture in the pastry shell.   Place olives on top nicely.  Put the cheese on and dribble the oil over it.  Bake in the upper third of a preheated oven for 25-30 minutes, or until quiche has puffed and browned on the top, and a knife inserted in the center comes out clean.
 
Bon Appetit!
XOXO,
The Hungry Teacher

Us near Nice, France this summer

Leave a comment

Filed under Dinner, Fish

Daring Cooks Challenge: Risotto

Blog check in line:
The 2010 March Daring Cooks challenge was hosted by Eleanor of MelbournefoodGeek and Jess of Jessthebaker. They chose to challenge Daring Cooks to make risotto. The various components of their challenge recipe are based on input from the Australian Masterchef cookbook and the cookbook Moorish by Greg Malouf.

So, I joined the Daring Cooks Challenge.  Each month, different people host and choose a recipe for the participants in the challenge to make.  You can check out the website here, if you’re interested!  The challenge remains a secret for all but the participants until the 14th of the month, when they are posted.

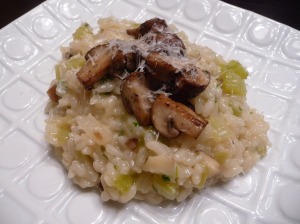
Well, this month’s challenge is risotto.  Last year, I was obsessed with learning to make risotto, so this is something I’m familiar with!  It’s a bit of work to make, but so much fun, and the results are so amazingly delicious!  You have to stir quite occasionally and stay near the stove… but it’s not that difficult, trust me!  I made my own chicken stock in the slow cooker, and I followed Jamie Oliver’s recipe for roasted mushroom risotto with parsley.  Wow!  Amazing!  The flavor and texture were incredible, and both the husband and I loved it.

The recipe for stock only made about 4 cups.  Next time, I’m going to increase the water, so I have more stock in the end.  If you have leftover stock, you can freeze it in 1 or 2 cup portions and use it when you need it!  It’s a great staple to have in the freezer – much better than boullion and cheaper than store-bought stock.

Jamie’s recipe called for celery in the risotto.  I made it using the celery, but it was a bit firm.  I am going to omit it the next time I make this recipe.  I don’t think it is crucial to the flavour of the risotto, and it will definitely improve the overall texture.

Chicken Stock
Recipe adapted from Make it Fast, Cook it Slow
Makes about 4 cups of stock

1 chicken carcass (I used one that I roasted a few weeks ago and threw in a ziploc bag in the freezer)
1 onion, cut in quarters, with peel
Some celery (I used about 3 or 4 stalks), coarsely chopped
2 carrots, coarsely chopped
5 green onions, coarsely chopped
1 head garlic, cut in half
3 bay leaves
1 Tbsp. Italian seasoning
6 cups water

The ingredients for chicken stock. As you can see, I left on the peels and cut everything really coarsely.

Put all ingredients into the slow cooker.  Cover and cook on low for 8 to 10 hours.

Let the chicken stock cool completely.  If you want to, at this point, you can dig in with your hands and remove the chicken meat and save it for soup or another recipe (I froze it in a ziploc bag).

Get a fine strainer (or a colander lined with cheese cloth) and strain all of the veggies and bones out of the liquid.  Discard the veggies and bones (they have no flavour now, trust me on this!). 

Refrigerate the stock overnight.  Now, the fat will be solidified and collected on the top of the stock.  Skim the fat off the top.  Now, season your stock to taste, and it’s ready to use!

Try the risotto!  It’s so delicious and indulgent, you’ll love it!

Roasted Mushroom Risotto with Parsley
(risotto ai funghi e prezzemolo)
Recipe from Jamie’s Italy
Serves 6

4 cups of chicken stock (you can substitute veggies stock if you prefer)
2 Tbsp. olive oil
a dollop of butter
1 large onion, peeled and finely chopped
2 cloves garlic, peeled and finely chopped
1/2 head of celery, trimmed and finely chopped
2 cups risotto (Arborio) rice
2 wineglasses of dry white wine
salt and freshly ground black pepper
1 cup of wild mushrooms, cleaned and torn (if you can’t find wild mushrooms, I used brown mushrooms and they were good!)
olive oil
1 bulb garlic, cloves peeled and halved
a small bunch of fresh thyme, leaves picked
1 Tbsp. butter
small bunch of fresh flat-leaf parsley, finely chopped
1 lemon
5 Tbsp. butter
approximately 1/2 cup freshly grated Parmesan cheese

Preheat the oven to 400ºF. 

Heat the stock.  Put the first amounts olive oil and butter in a separate pan, add the onion, garlic and celery and cook slowly for 15 minutes, without coloring the vegetables.  When the veggies are softened, add the rice and turn up the heat.

The rice will begin to lightly fry, so keep stirring!  After a minute, it will look slightly translucent.  Add the wine and keep stirring. 

Once the wine has cooked into the rice, add a ladle full of hot stock and some salt.  Turn the rice down to a simmer, so it doesn’t cook too quickly.  Once the stock is absorbed, add another ladle full.  Keep stirring the rice, and waiting until all of the stock is absorbed before adding the next ladle.  After about 15 minutes, check the rice to see if it’s cooked.  If not, keep on adding stock until the rice is cooked.  If you run out of stock before the rice is cooked, you can add boiling water in place of the stock.

When the rice is getting close to being finished, it’s time to roast the mushrooms.  Heat a heavy, ovenproof frying pan until medium hot and add a splash of oil.  Fry the mushrooms for a minute or two, until they begin to color and season with salt and pepper.  Add the garlic, thyme, and butter and 1 Tbsp. butter and mix together.  Place the pan in the oven and roast the mushrooms for 6 minutes or so, until cooked through and rich in flavor.

When the rice is cooked, remove from the heat and add the 5 Tbsp. butter, Parmesan and parsley.  Stir well.  Place a lid on the pan and allow to sit for 2 minutes.  Roughly chop half of the roasted mushrooms and stir into the risotto.  Add a good squeeze of lemon juice to balance the flavours.  Season carefully to taste.  Divide between plates and sprinkle the remaining mushrooms on top.  Serve with grated Parmesan to garnish.

Enjoy this treat!
XOXO,
The Hungry Teacher

7 Comments

Filed under Dinner

Croissants

My pride and joy!

While traveling Europe last summer, I discovered the wonderful, flaky, buttery nature of real, fresh croissants.  Previously to this, my only experience with croissants was the (at least) one-day-old, kind of stale, a bit flaky but not really, dry ones you can get from the grocery store.  I just didn’t understand what all of the fuss was about.

We went on a cruise through the Western Mediterranean.  I began noticing every morning that all of these Europeans on the ship with us would stock up on the croissants at the breakfast buffet.  Seriously, the staff were ALWAYS restocking that tray!  So, I branched out, and tried one.  WOW!  It opened up a whole new world to me!  The best croissant I remember eating was at the main train station in Berlin.  We were walking by a coffee shop, and the lady working there was restocking the food counter with hot, fresh croissants.  You could smell their freshness!  So, I bought one, and it was amazing!  It made the moment of sitting on the ground, waiting for a train to take us to our next destination (Amsterdam, I think), a completely memorable moment. 

So, this has made croissants something I’ve been dying to try to make.  Now, croissants take a lot of time to make.  The dough needs to be rolled, folded and chilled a few times to make those delicious flaky layers.  I worked up the courage, and tried it on Monday.  I baked my croissants on Tuesday, and it was totally worth the work.  Wow!  But, aside from the time, it’s not really that difficult to make croissants.  If you can roll out dough and have some patience, I think you can probably do it.  


It takes a day where you can be in and out of the kitchen… at least 5 or 6 times, allowing the dough to chill in between, and then at least an hour or preferably overnight to chill the dough before you bake the croissants.  It’s a lot of time, but it’s worth it.  Trust me!  There is a lot of time that you don’t need to be paying attention to the dough and you can do other things.  After you’re done, you will have a reaction similar to mine (dancing around the kitchen, chanting “I did it! I did it!”).  I feel fulfilled as a baker now!  

I got the recipe from The King Arthur Flour Baker’s Companion.  I borrowed it from my Grandma’s house, and let me tell you– this is a comprehensive baking cookbook!  It is over 600 pages long, with tons of information and recipes.  I may have to buy it for myself… it’s that good! 


Puff Pastry
Recipe from The King Arthur Flour Baker’s Companion
Half of the dough makes 12 croissants (freeze the other half; see below) 

3-1/2 cups all-purpose flour
4 Tbsp. chilled butter
1-1/2 tsp. salt
1-1/4 cup cold water 

Butter mixture:
1/2 cup unbleached all-purpose flour
1-3/4 cup butter, softened, but still cool to the touch 

1 egg beaten with 1 tbsp water, to glaze croissants before baking 

Place the flour in a medium bowl and combine it with the chilled butter until the mixture resembles cornmeal  (I used frozen butter and grated it in, using the coarse side of my box grater.  You could also use a pastry blender).  Add the salt to the water, stir well, and then add to the flour.  Mix gently with a fork until the dough is rough and pulls away from the sides of the bowl.   (If you need to add more water, do so one tablespoon at a time until the dough holds together).  Turn out the dough onto a lightly floured surface, and knead until it’s smooth and a bit springy; 2-3 minutes.  Pat it into a square, wrap it in plastic wrap and refrigerate for 30 minutes. 

Now, for the butter mixture.  Using a mixer, a food processor or a spoon, combine the flour and butter until they are smooth and well-blended.  Lightly flour a piece or plastic wrap and on it, shape the butter-flour mixture into an 8-inch square (this was a bit messy for me.  Use a spatula or something to help you).  

The butter and flour on a piece of plastic wrap.

 
Cover the butter and place it on a flat surface in the fridge for at least 30 minutes (I put mine on my cutting board and slid the whole thing in the fridge).  

Now, after everything has chilled for at least 30 minutes, remove the dough from the fridge, and roll it into a 12 inch square on a lightly floured surface.  Put the butter square in the center of the dough, so it looks like a diamond in the square (my dough wasn’t very square, but you can still get the idea from the picture!) 


Put the butter on the dough so it looks like a diamond in a square.

Fold the flaps of the dough over the butter until they meet in the middle.  Pinch and seal the edges of the dough together; use a bit of water if necessary.  

Fold the edges of the dough in, and pinch them together to completely cover the butter mixture.

Dust the top of the dough with flour, then turn the dough over, and gently, tap it with the rolling pin into a rectangular shape.  Make sure the dough isn’t sticking, and roll it from the center into a 20 x 10 inch rectangle.  

A 10 x 20 inch rectangle. Yes, I used a measuring tape to measure.

Lightly sweep off any excess flour from the top of the dough with a pastry brush, and then fold the bottom fold up to the center, and the top third over (like a letter!). 

Here is my dough. I folded it and then unfolded it to show you what it would look like.

Fold the top third down

Fold the bottom third up. This picture is taken from the other side of my peninsula, which is it looks reversed.

Make sure the edges of the dough are lined up evenly.  Now, turn the package 90 degrees to the right, so it looks like a book that is ready to be opened: 
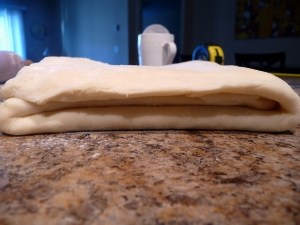
The dough, rotated, so this side is facing you!

You’ve successfully completed one turn!  

Now, if your dough is still relaxed and soft to the touch, roll out your dough and fold it again.  Once you’ve completed two turns, wrap your dough in plastic wrap and chill it in the fridge for at least 30 minutes.  Classic puff pastry gets six turns before being formed into shapes, and it needs to rest, chilled for at least 30 minutes between every two turns. 

So, once you’ve completed six turns, wrap your dough well and chill for at least an hour (or preferably overnight). 

This recipe makes enough for 24 croissants, so  at this point, cut your dough in half, wrap one half very well and put it in the freezer.  It will keep for 3- 6 months.  Thaw it in the refrigerator overnight before you use it. 

When you’re ready to make your croissants: 

Take out the dough (half of your puff pastry recipe), and on a lightly floured surface, roll the dough to a 12 x 18 inch rectangle.  Trim the edges with a sharp knife all the way around, using a ruler (this cuts off the folded edges, that would inhibit the puff). 
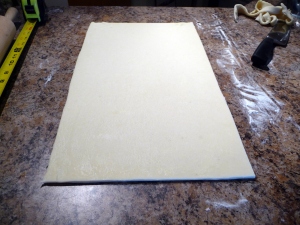
The dough trimmed into a 12 x 18 inch rectangle

Cut the dough into thirds lengthwise, and in half through the middle.  You should have 6 pieces of dough. 

The dough is cut into 6 rectangles.

Now, cut each rectangle in half diagonally, and arrange the pieces so that the point of the triangle is facing away from you.  Cut a 1/2″ notch in each triangle, on the short side, then roll up, away from you. 
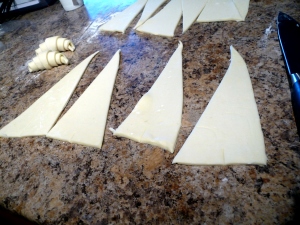
Two croissants already folded. If you look carefully in the dough on the right, you can see the notch that was cut.

Make sure that the point is tucked under the bottom of the croissant.  You can stretch the dough to achieve this, if necessary.  Form the croissant by bending the two ends towards each other. 

I decided that the two of us here didn’t need to eat 12 croissants.  So, I formed 6 of them, and froze them on a baking sheet, to be put into a freezer bag when solid.  To bake them, I’m going to thaw them in the fridge overnight, and then bake as directed below. 

Place the croissants on a lightly greased baking sheet (I used a stone).  Cover and chill for at least 30 minutes.  During that time, preheat the oven to 425°F. 
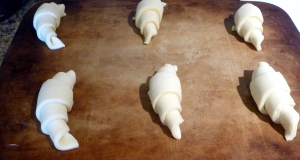
My croissants, waiting to be baked

 Take the croissants, out of the fridge, uncover them, and brush the tops with the beaten egg.  Bake for 15 minutes.  Reduce the heat to 350°F, and bake for another 10-15 minutes.  The croissants should be deep golden brown, even where the edges of the dough overlaps.  Remove from the oven and cool completely on a wire rack. 

 

Now, enjoy them!  Eat them as a special treat with someone you love!  All of the work is worth it when you bite into that flaky, buttery delight! 

Love,
The Hungry Teacher 

5 Comments

Filed under Baking

Chicken Vindaloo and Naan

Indian food is so delicious!  It’s comforting, spicy, warm and incredible.  A month or so ago, I made my first curry from scratch.  Wow!  Incredible!  You can find the recipe here: Chicken Tikka Masala.

Last time I made curry, I used regular white rice.  It was fine, but Basmati rice is the way to go!  It makes the experience of eating homemade curry seem much more authentic.  I cooked mine according to the package, and it was great!  It even smells more authentic, seriously!

I also served this with homemade naan.  Naan is an Indian flatbread, and it is so good!  I made it using the bread dough recipe found here.  This is the bread dough found in Artisan Bread in 5 Minutes a Day.  You must check this book out!  You make your bread dough, which is really simple and requires no kneading.  Then, after letting it rise on the counter for 2 hours, you put it in your fridge, where it lasts for up to 2 weeks!   You can make it into naan, pizza dough, foccacia bread, a freestyle loaf called a boule or baguettes (and those are just the options I’ve tried!).  The bread is fantastic.  To make the naan, take out a cast iron pan (mine is 10″) and heat it over medium high heat.  Take a peach sized ball of dough, and roll it out so it is thin.  When the pan is really  hot, add some oil to it.  Then, add your dough.  Cover it with a lid so it traps in the steam.  When the bottom is browned (about 3 minutes), flip it over and continue cooking for about 3 more minutes, until the other side is browned and the dough is firm and cooked through.  Brush with some melted butter, and enjoy!  It is so good!  The husband came home for leftover curry and rice, and I even whipped up a quick naan to go with our lunch (from my pre-made bread dough, of course).

Chicken Vindaloo is spicy.  But, it is spicy in a flavorful way.  I hate food that is spicy just to be spicy.  I want FLAVOR!  The recipe, which  I got from Jamie’s Food Revolution, called for 1-2 thin red chilies.  My grocery store was out of them, so I just omitted them.  The heat from the Vindaloo paste was perfect, and next time I make this recipe, I will just leave the chilies out.

Now, this recipe calls for Vindaloo paste.  You should be able to find this in the Asian aisle at your grocery store.  The brand I used was Patak’s (and this is the same one Mr. Oliver recommends).  Now, please note that this is the PASTE, not the actual sauce you can buy pre-jarred.  The recipe also calls for cilantro.  I am a cilantro hater.  There.  I said it.  If you love cilantro, you could add a small bunch, cutting up the stalks and adding them with the onions, etc, and sprinkling the leaves on top as a garnish. 

Jamie’s recipe calls for diced pork shoulder, but says you can use chicken or lamb.

Chicken Vindaloo
Recipe adapted from Jamie’s Food Revolution
Serves 4-6

2 medium onions, halved and finely sliced
4 cloves garlic, finely sliced
1-2 fresh red chilies, to your taste (I omitted these), finely sliced
a thumb-sized piece of fresh ginger, peeled and finely sliced
4 ripe tomatoes, chopped in big pieces (Jamie says to quarter them, next time I’ll use a rough dice)
vegetable oil
a pat of butter
1-3/4 lbs diced chicken breast
1/2 cup vindaloo or hot curry paste
sea salt and freshly ground black pepper
1/3 cup balsamic vinegar
1 Tbsp. honey
natural yogurt
1 lemon

Put a large pan on medium to high heat and add some vegetable oil and the butter.  Add the onions, garlic, chile and ginger and cook for about 10 minutes, until softened and golden.  Add the chicken and the curry paste.  Stir well to coat everything with the paste and season with salt and pepper.  Add the tomatoes, balsamic vinegar, honey and about 1-2/3 cups of water (enough to cover everything), and stir again.  Bring to a boil, then turn the heat down and simmer for 45 minutes with the lid on.  Stir regularly to make sure it’s not sticking.  Now, Jamie says to add extra water if needed, but I had to simmer with the lid off for a bit to get my curry to the proper consistency.  When the meat is cooked through, season carefully with salt and pepper.

Serve with basmati rice and some yogurt spooned on top.  Serve with lemon wedges on the side to squeeze over.

Yum!
The Hungry Teacher

Stumble It!

3 Comments

Filed under Bread, Chicken, Dinner

Kung Pao Chicken

Stir-fry.  For some reason, my husband and I are not big fans of either Chinese food (the kinds in Chilliwack) or stir-fry.  I’m not even sure exactly what it is about it that we don’t like!  Other Asian food-Indian, Thai, Japanese  is fantastic!  We like soy sauce and ginger, but just not really Chinese food.  However, there is one recipe that we do really like.  It’s for Kung Pao Chicken.  It is spicy, flavorful and delicious!  And since we like at least one stir-fry, it gives me hope that maybe one day I’ll be brave enough to try another.

Now, a few notes about this recipe.  Sambal oelek is an Indonesian spicy red chili paste that you can buy at the grocery store in the Asian aisle.  It is one of my husband’s favorite condiments (because it’s also in his favorite Dutch-Indonesian dish, Nasi Goreng).  You can buy a chunk of gingerroot, cut off what you need and freeze the rest.  I always think it would be easier to peel it before I freeze it, but I usually end up being too lazy and I have to peel it when I use it.  I used a whole green pepper and omitted the red pepper– the green pepper is at least half the price of the red pepper.  Oh, and PREP EVERYTHING BEFORE YOU START COOKING.  I’ve learned this the hard way.  It’s worth the extra five minutes before you start.  You will not have time to chop once you start cooking!!!!

Kung Pao Chicken
Recipe from Company’s Coming Most Loved Main Courses
Serves 4

Kung Pao Sauce
1 Tbsp. cornstarch
1 Tbsp.  Hoisin sauce
1 Tbsp. soy sauce
1/2-1 tsp sambal oelek (chili paste)
2 Tbsp. water

1 Tbsp. soy sauce
1 Tbsp. cornstarch

1 lb. boneless, skinless chicken breast halves or thighs, diced
1 tsp sesame or cooking oil
1 egg white, beaten
1 garlic clove, crushed

1 Tbsp. cooking oil
1 garlic clove, crushed
1/2 tsp. finely grated peeled gingerroot
2 small carrots, thinly sliced

1/2 cup diced green pepper
1/2 cup diced red pepper
1-5 fresh small red chilies, seeds and ribs removed for less heat
3 green onions, cut into 1″ pieces

1 Tbsp. cooking oil

Kung Pao Sauce: Combine the cornstarch, hoisin sauce, soy sauce, sambal oelek and water in a small bowl until smooth.  Set aside.

Stir the second amount of soy sauce into the second amount of cornstartch in a medium bowl until smooth.  Add the chicken, sesame oil, egg white and garlic clove.  Stir until the chicken is well-coated.  Set aside.

Heat a wok on medium-high heat until hot.  Add cooking oil.  Add the second amount of garlic, ginger and carrot.  Stir-fry for 1 minutes.  Add the peppers, chilies and green onions and stir-fry for 1-2 minutes or until peppers are tender-crisp (mine took closer to 5 minutes).  Transfer to a separate medium bowl.

Add the second amount of cooking oil to the wok.  Add the chicken mixture.  Stir to break up the chicken.  Stir-fry for about 3 minutes, until chicken is no longer pink.  Stir the sauce and add to chicken mixture.  Stir until it is boiling and thickened.  Add the pepper mixture.  Heat and stir until it is heated through and the peppers are coated. 

Serve with rice noodles, other noodles or rice!

Enjoy!
The Hungry Teacher

Stumble It!

Leave a comment

Filed under Chicken, Dinner

GOLD!!!

I’m proud to be a Canadian! 14 gold medals and an amazing experience, the Olympics over. It’s been a great experience… we went to women’s preliminary curling and the preliminary Canada vs. US men’s hockey game, plus we spent a day enjoying the atmosphere in Vancouver. It was an incredible party!

So, on Sunday, for the Gold Medal hockey game (Canada vs. US, in case you missed it!), one of my friends had some people over for a party. We had a great time, and were incredibly nervous when the US tied the game in the final seconds. But, just a few minutes later, in overtime, when Sidney Crosby scored, there was cause for GREAT jubilation!!!!!!!

I decided to try to make a Team Canada hockey jersey cake! It turned out great… it took me a lot longer to decorate than I anticipated, but the results were worth it!  I haven’t decorated a lot of cakes before, so this was a learning experience for me!

First, I baked a 9 x 13″ cake. I used my Grandma’s Pound Cake recipe.  I baked it for 30 minutes and it was perfect!  I used a chocolate cake mix and chocolate pudding mix.

Then, I let the cake cool for 10 minutes in the pan on a wire cooling rack.  After this, I took the cake out of the pan and let it cool on the wire rack overnight.

In the morning, I cut the cake by following the instructions on this blog I found.  It basically involves cutting the cake and reassembling it.  It’s really easy.  I think next time I make the cake, I am going to trim the top of the cake to make it level (when I assembled the cake, I put the bottom on the top, but then, the unlevel top made the bottom uneven).

After that, I put a crumb coat on the cake.  I used the Vanilla Buttercream Frosting recipe.  A crumb coat is a thin layer of icing that you put on the cake to contain the crumbs.  Let the crumb coat dry for a while (maybe 15 minutes).  I ended up having to do another crumb coat, as the crumbs kept getting on the second coat (remember, I am an inexperienced cake decorator!).  A note:  keep the bowl of frosting covered with a damp tea towel.  Otherwise, it dries up really quickly.  I then made half a batch of frosting because I ran out.  I put the top coat of frosting on.

Now, I only have liquid food coloring at home (the cheap stuff from the grocery store).  To get the best colour for frosting, you have to use the paste colouring that you buy at a cake decorating store.  And by the time I thought about this, it was 10:00pm on Saturday night, and all cake decorating shops are closed.  I was worried that my frosting would only turn out pink, and not red.  Who wants a pink maple leaf on a Team Canada cake?  So, I went to the grocery store and found some cookie frosting that was premade in a tube.  It was the perfect colour!

Now, I am not an artist.  So, to create the perfect maple leaf, I printed a Canadian flag out on my computer.  Then, I cut out the maple leaf.  After that, I put in on the jersey and lightly traced around it with a sharp knife.  Then, I peeled off the paper, and went to work tracing around the outline with the frosting.  I then filled it in, and added the rest of the details!

On Sunday morning, cutting and decorating the cake took me about two hours in total.

And, voila!  A patriotic, Go Canada Go! cake.  By the way, it tasted great and received rave reviews.

The jersey cake idea is totally versatile, and now all I’m waiting for is the Vancouver Canucks to make it into the Stanley Cup final so  I have an excuse to make another one!

Proud to be a Canadian!
The Hungry Teacher

Stumble It!

7 Comments

Filed under Chocolate, Dessert